If you’re looking for a way to lose weight, building muscle is one of the best ways to do it.
The reason for this is that muscle burns more calories than fat does—in fact, a pound of muscle burns about six times as many calories per day as a pound of fat.
So if you’re trying to lose weight, building muscle is an obvious choice. However, it’s not always easy to know what kind of exercises will help you build muscle while also helping you lose weight. That’s why we’ve written this blog post!
We’ll go over some tips on how to get started with a heavy bag workout program and how it can help you lose weight faster than other forms of exercise alone.
Right here on Buy and Slay, you are privy to a litany of relevant information on heavy bag workout benefits, heavy bag workouts for beginners, punching bag workout women, and so much more. Take out time to visit our catalog for more information on similar topics.
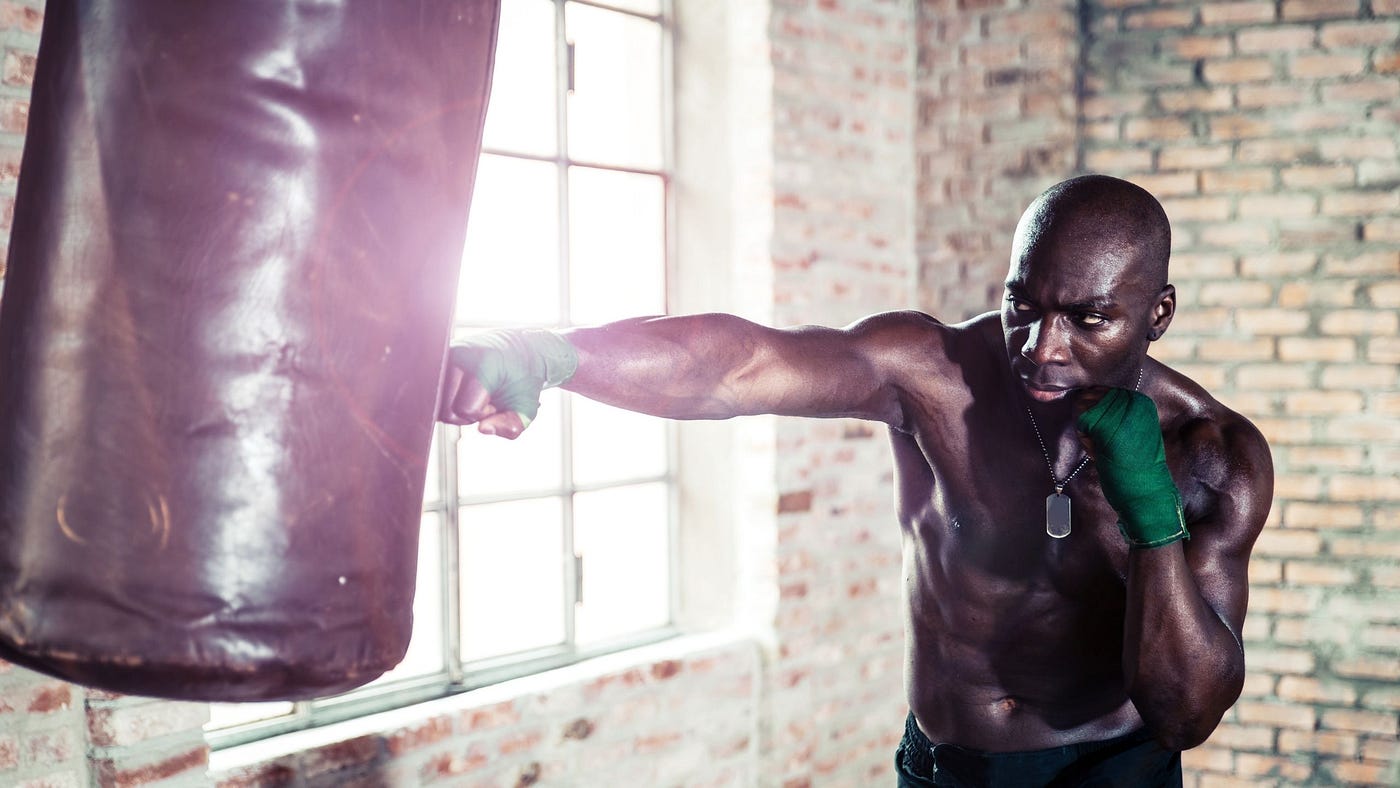
Heavy Bag Workout For Weight Loss
Throwing a few quick jabs at a punching bag may not seem too hard, but if you’ve never used a heavy bag during a boxing workout, you’re in for a challenge. Most heavy punching bags weigh between 50 and 150 pounds. So every time you lay into the bag, your fist, foot, or knee is met with significant resistance.
The initial (and somewhat unexpected) impact can be a bit jarring, and it won’t take long to realize you can’t get away with throwing soft punches. You have to engage your entire body, including your core, shoulders, and hips, to effectively control your movements as you hit the bag.
Of course, any exercise that requires this type of total-body engagement can help you torch calories and strengthen your major muscle groups. Even more than that, though, boxing against a heavy bag (or an actual person) is one of the only cardiovascular exercises that provides upper body, bone-building repetitive impact.
One 2008 study published in Applied Physiology, Nutrition, and Metabolism, found that female boxers were more likely to have higher bone mineral density than other women of similar age and anthropometric measurements. Boxing, apparently, does the body good.
With more boxing-style workouts and boutique fitness centers popping up to provide accessible classes to the general public, punching bags are becoming a hot fitness trend. If you’re tempted to buy a bag for home-based workouts, or if your gym has a bag or two you can use on your own, consider giving this workout a try.
Reggie Chambers, NASM-certified personal trainer and boxing and kickboxing coach who trains at Limelight Fitness Center in Manhattan, put this interval workout together, citing it as one of his personal favorites.
To complete the workout, perform each exercise according to the suggested time intervals. After finishing all of the exercises, rest for a minute, then repeat the series a second time for a total of 20 minutes. Twenty minutes may not seem like much, but don’t underestimate this challenge—you’re practically guaranteed to break a sweat.
Warm Up
:max_bytes(150000):strip_icc():format(webp)/jumping-jacks-boxing-warmup-5ac0450f119fa800370d1069.jpg)
Before diving into a high-intensity workout like boxing, it’s important to spend at least 5 to 10 minutes getting warm. An active and effective warm-up should take you through exercises that mimic the movements you’ll perform during your main workout. Perform each of the following moves for 30 seconds, completing the series three to four times:
- Jog in place
- Jumping jacks
- Air squats
- Shadowboxing: Perform light punches into the air, alternating arms as you bounce lightly from foot-to-foot like a boxer
- High plank to downward dog: Start in a high plank or pushup position, then press your hips up toward the ceiling as you extend your shoulders and reach your heels toward the ground to come to a downward dog; shift back to a high plank position and continue alternating between the two.
Jab, Cross, Squat
:max_bytes(150000):strip_icc():format(webp)/punching-bag-workout-2-5ac0449bff1b7800376c5668.jpg)
Time: 45 seconds work, 15 seconds rest
Stand to face the punching bag in a boxing stance. Your feet should be shoulder-distance apart and staggered with one foot in front of the other. If you look down at your feet, the toes of your front foot should be aligned with the heel of your back foot, and the toes of both feet should be pointing at a 45-degree angle to the punching bag.
Raise your hands, positioning them like you’re prepared to punch, remembering that one of them should always be protecting your face. Throw two punches in quick succession—first jabbing with your left arm, then crossing with your right—before performing a squat. Immediately return to standing and continue the jab-cross-squat sequence for the full 45 seconds.
When the 45 seconds is up, rest for 15 seconds before proceeding immediately to the next exercise.
Cross Punches (Dominant Side)
Time: 45 seconds work, 15 seconds rest
According to Chambers, cross punches are designed to target the shoulders and arms. If you think 45 seconds is easy, he says you should make sure you’re really throwing your full force into each cross punch, keeping your abs tight and face protected with your non-working hand.
The trick here is understanding that the power of the cross comes from transferring your weight forward as you take your swing.
If you’re right-handed, set up in a boxing stance with your left foot forward, your weight primarily on your back foot so your center of gravity is shifted slightly away from the bag. If you’re left-handed, set up in reverse, so your right foot is forward and your left foot is behind.
As you take your punch across your body with your dominant arm, shift your weight forward, using the force of your weight to catapult your fist to the bag. At the completion of the punch, make sure your hand returns to its position in front of your face instead of swinging downward. You should immediately shift your weight back to the starting position to set up for another powerful cross.
Continue for the full 45 seconds using your dominant arm. Rest for 15 seconds before continuing to the next exercise.
Cross Punches (Non-Dominant Side)
Time: 45 seconds work, 15 seconds rest
Complete the same exercise as before, this time focusing on your non-dominant side. If you’re right-handed and just completed a set of cross punches using your right arm, this time use your left arm, setting up in a boxing stance with your right foot forward, your left foot back, and your weight shifted primarily to the back foot.
Likewise, if you’re left-handed and just completed a set of cross punches using your left arm, this time use your right arm. Setting up in a boxing stance with your left foot forward, your right foot back, and your weight shifted primarily to the back foot.
Complete 45 seconds of powerful cross punches. Rest for 15 seconds before proceeding to the next exercise.
Side-Kick Punch Combos
Time: 90 seconds work, 30 seconds rest
Set a timer for 90 seconds and complete as many rounds as possible of this four-move series:
- 10 reps of right side-kicks
- 30 straight punches
- 10 reps of left side-kicks
- 30 straight punches
To get started, Chambers says to stand about a leg’s-length away from the punching bag so your right side faces the bag. Get in your boxing stance with your right leg back and your arms up, your left arm guarding your face with your right hand in front of your chin. Swivel your hips, shifting your weight to your left foot before pivoting, lifting your right leg from the ground with your knee bent.
Powerfully strike your right foot out as you extend your knee and hip, hitting the heavy bag with the heel of your right foot. Your right foot should be flexed with your heel sticking out so it makes first contact with the bag. Recoil your foot and knee immediately, bringing your right foot back down to the starting position.
Complete 10 reps as quickly and powerfully as you can before switching sides.
Once you’ve performed 10 kicks on the right side, deliver 30 straight punches to the bag with your right arm. Rotate your position so your left side faces the bag, then continue, this time delivering 10 left side-kicks followed by 30 straight punches with your left arm.
Complete as many rounds as possible in 90 seconds. Rest for 30 seconds before proceeding to the next exercise.
Lunge, Kick and Jab, Cross
Time: 45 seconds work, 15 seconds rest
Stand to face the punching bag so you’re positioned about a leg’s-length away. Step backward with your right foot to perform a reverse lunge. From the bottom of the lunge, powerfully explode up, shifting your weight to your left foot as you return to standing.
As you do, swing your right knee up in front of your body to perform a front kick, powerfully extending your right leg to kick your right heel into the punching bag.
From here, Chambers says to bring your right foot down into a boxing stance so your feet are staggered before performing four cross punches, alternating hands with each punch. Immediately switch sides, this time performing the reverse lunge and front kick with your left leg before performing the four cross punches. Continue alternating sides for the duration of the interval.
After 45 seconds of work, rest for 15 seconds before proceeding to the next exercise.
Hooks (Dominant Side)
:max_bytes(150000):strip_icc():format(webp)/hook-punch-5ac046bfc5542e00376ed238.jpg)
Time: 45 seconds work, 15 seconds rest
“This is an incredible oblique workout,” Chambers says. Hook punches require fast, powerful cross-body movements that fire up your core, shoulders, and even your hips.
Start in a boxing stance with your dominant foot staggered back (if you’re right-handed, your right foot should be back). Turn your front foot in about 45 degrees and center your weight between your legs. Lift your back heel off the ground and bring your hands up to your face.
Perform successive hook punches with your dominant hand by twisting your back hip forward as you pivot on your back foot and use your core power to swing your dominant hand up and across your body to punch the bag at an angle so your forearm ends up parallel to the ground in front of your face. Pivot back to the starting position and continue as fast and powerfully as you can for the full 45 seconds.
Rest for 15 seconds then perform the same movement to the opposite side.
Hooks (Non-Dominant Side)
Time: 45 seconds work, 15 seconds rest
After completing hook punches with your dominant arm, you’ll repeat the exercise, this time using your non-dominant arm to deliver the punches. Set up with your non-dominant foot staggered back and repeat the hip-swivel, pivot, and punch.
Continue for 45 seconds before resting for 15 seconds. Proceed to the next exercise.
Burpee With Pushup, Straight Punches, Hooks
Time: 45 seconds work, 15 seconds rest
This is the last exercise in the series before you get an extra minute of rest. Push hard and finish strong.
Stand about an arm’s length away from your punching bag with your feet hip-distance apart, knees slightly bent and perform a burpee:
- Squat down, placing your hands flat on the ground under your shoulders and step or jump your feet back so your body is in a high-plank position with your core tight and your body forming a straight line from heels to head.
- Perform a pushup, bending your elbows as you lower your chest toward the ground. Press back to the high plank position.
- Step or jump your feet back, moving toward your hands.
- Explode upward, jumping straight into the air.
- Land softly, slightly bending your knees and hips.
Land with your feet in a slightly staggered boxing stance. Immediately punch the heavy bag with a straight punch from your left then your right hand. Follow the straight punches with a left then right hook.
Continue the exercise series, completing as many full rounds as possible in 45 seconds.
Bonus Workout: Pushup and Punching Reverse Pyramid
If the full 20-minute workout seems like a little too much to handle, consider trying this quick-and-effective option from Jimmy Fusaro, a former fighter and full-time instructor at X Fit Training.
Simply alternate between pushups and punching with a reverse pyramid-style rep scheme as follows:
- 10 pushups
- 10 punches
- 9 pushups
- 9 punches
- 8 pushups
- 8 punches…
Continue subtracting one repetition from the previous number all the way down until you finish with one pushup and one punch.
The beauty of this style of workout is that it’s almost infinitely flexible. For instance, instead of doing pushups, you could do squats or lunges or burpees or crunches. Instead of doing alternating straight punches, you could isolate one side or incorporate other styles of punch, like hooks or uppercuts. You could even sub kicks in place of the punches.
Plus, you can keep the routine going. Once you make it all the way down the pyramid to one repetition of each exercise, you can make your way back up the pyramid by adding a repetition to each exercise until you make it back to your starting number of repetitions.
Doing just 4 or 5 minutes of this style of workout is the perfect high-intensity finisher for practically any routine.
Heavy Bag Workout Benefits
There are many health benefits of heavy bag workouts. In terms of physical benefits, it improves aerobic fitness, core stability, coordination, power, stamina, and endurance. In addition, it increases upper body strength and strengthens bones and ligaments. There are also psychological advantages, such as improved self-esteem, confidence, and body image.
In a nutshell, it improves the entire body and the mind as well. It’s hard to find a sporting activity that has so many positive effects.
But, let’s get into the details.
Punching bag workout for weight loss
You can burn a lot of calories with a punching bag workout. Someone who weighs 160 pounds can burn 500 calories. Obviously, the number of calories you burn depends on how hard you work, weight, age, etc. Bag workouts that are well-planned and intense can burn far more calories than that.
To lose weight by punching a bag, you have to do it right. It’s fun to strike a bag a few times, but that won’t keep your body burning calories as it should. As opposed to this, you should instead work the bag intensely for 2 or 5 minutes, taking a break of 1–2 minutes between rounds. You raise your heart rate by hitting the bag this way and keep it up by maintaining regular exercise.
However, this boxing workout only works if you eat right and work out three to four times a week.
You will build toned muscles
It is an excellent exercise for developing strength and increasing power because you target muscles as much as possible during heavy bag workouts. While training with a heavy bag, you work the arms, shoulders, chest, back, legs, and core simultaneously, which makes it a great full-body workout.
Since heavy bag training combines cardio and strength training, you won’t build huge muscles.
You can be lean just by boxing, but to be ripped, you need muscle too. Muscle can be built with strength training, while fat can be burned with boxing.
For example, I have 3–4 bodyweight works per week that help me to build muscles. And, I do heavy bag training to improve my endurance, burn fat and have fun.
Better functioning body and mind
A coordinated body is one in which the muscles interact efficiently and with smooth, accurate movements. When coordinated, the correct muscle is selected at the right time with the right intensity to produce the right outcome. That’s an important physical skill that you can significantly develop by hitting the bag.
Also, it works the entire core effectively. Core muscles are responsible for controlling your body effectively and preventing unintentional movements of your limbs and spine. That way, you can perform all sorts of activities much better and avoid injuries.
It’s among the best body conditioning exercises!
Body conditioning exercises target your whole body, strengthening, sculpting, and toning your body simultaneously. Multi-type activity is often included, such as flexibility training, strength training, and resistance training. This helps you to develop power, coordination, and speed.
Hitting the punching bag makes your mind healthy too!
Fitness and strength are among the most apparent benefits of boxing. As a result, that will also benefit your mind, since you’ll feel better about yourself and that will give you more self-confidence. It gives you a chance to know yourself better, too.
Simple correlation and multiple reggression analyses revealed young boxers’ self-esteem was positively related to their personal and social responsibility. This finding results reinforce the view that people who appreciate themselves and have a sense of personal empowerment will improve their personal and social responsible behaviors.
Ağbuğa, Bülent. “Relationship between self-esteem and personal and social responsibility in young boxers.” Pamukkale Journal of Sport Sciences 5.2 (2014): 48–59.
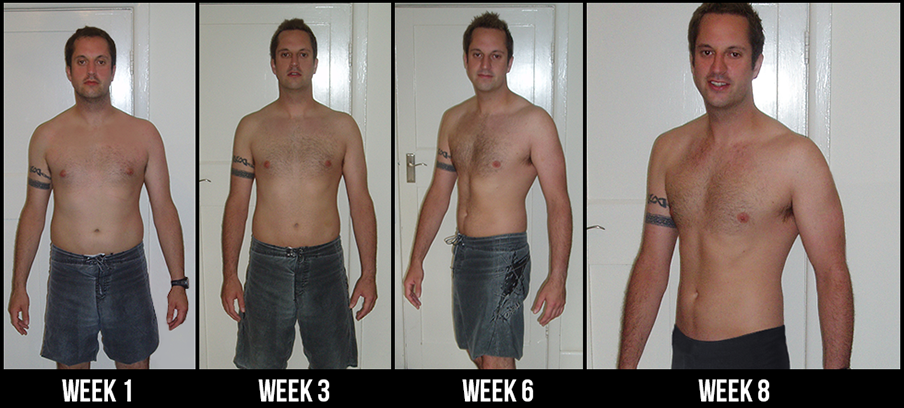
As you see, the heavy bag workout results are numerous. But, here is a punching bag before after picture for motivation.
Heavy Bag Workouts For Beginners
Let’s start by figuring out what makes a heavy bag.
Heavy bags are cylinder-shaped bags, usually suspended in front of the boxer. They’re very heavy, you usually want to train with a bag that’s more or less half your weight. That’s not a hard and fast rule, you can just round up to the nearest available weight. It’s not going to be the end of the world if you get a bag that’s heavier than you.
The heavy bag is completely unlike speed bags. Speed bags are filled with air and designed to test your reflexes and accuracy. They move around a great deal with every strike.
They’re usually four to five feet in length, and they’re built to take a beating. Heavy bags are for building your resilience, most of your time practicing your boxing technique is going to be spent hitting something. If your hands are too tender for that, then you’re not going to get very far. So you’re using these bags to build up your tolerance to that kind of impact as much as you’re using them to build your physical endurance.
There are different variants of heavy bags, like the Muay Thai banana bags. Those are just longer and more narrow, so you can practice your low kicks more effectively. There are also uppercut bags. These are shaped like a wrecking ball or a teardrop, and they’re for exactly what you’d think they’re for. You can also find freestanding bags that are placed on a weighted base. These are just as good as a suspended bag if that’s all you have available for your workout.
PUNCHING YOUR WAY TO SUCCESS
Why use a heavy bag for your exercise routine?
They’re one of the best tools for a full-body workout. You want to be bobbing and weaving as well as throwing heavy and quick punches. There’s not a part of your body that escapes the full-body punishment you throw at it when you’re practicing your punches. It’s a much better option for getting your heart rate up than running. You’re really getting in there and working out your entire body.
You’re also not adding any weight to your workout when you’re doing the heavy bags, so you’re getting in a high number of reps. It’s amazing calisthenic exercise.
Calisthenics is all about exercising several muscle groups at the same time and covering your entire range of motion. These bodyweight exercises burn through fat. Your body wants to be as efficient as possible.
As you get stronger doing calisthenic exercises, you burn up more of the extra energy you have stored in your fat cells. As your muscles develop, you’re able to do more work, which burns more energy, which burns more fat.
Hitting the heavy bags effectively will up your dexterity as you learn your combos, it’ll sharpen your mind as you memorize your movements and visualize your opponents while practicing your shadowboxing, and you’ll tone your muscles as you burn fat.
THE BASICS
If you’re truly just starting out on the heavy bags, you’re going to need to know the basics.
Stance: The most important thing when you’re starting any new exercise is your form. So when you’re squaring up against your immortal foe, the punching bag, here are some things to review about your stance.
- Stand up straight with your feet shoulder-width apart, you want balance and a solid foundation.
- Put one foot slightly ahead of the other. The foot you’re shifting forward is going to be on the same side you’ll throw your jabs with. In most cases, this will be your left foot, unless you’re a southpaw.
- Put half of your weight on your front foot, and raise your rear heel slightly
- Bring both of your hands up to just above your chin
- Make a fist, keep your thumbs on the outside, and keep your elbows tucked in towards your sides
- Give your knees a slight bend
- Congratulations, now you’re standing in the guard position
Once you’ve gotten your stance down, be sure to reexamine it each time you step up to the plate until it feels like second nature.
Now that you’ve got that down, we’re going to learn the different punches and movements you’ll need for these beginner exercises.
Jab:
- The jab is incredibly basic. Start in guard position, and extend the arm one the same side as your forward foot towards your target
- The speed of your jab comes from how quickly you extend your arm. Keep your arm relaxed when you jab, and you’ll get the most speed out of it possible.
- If you’re having a hard time getting power out of your jab, focus on rotating your arm and tightening your fist.
Cross:
- From your guard position, throw your rear hand toward your target
- Visualize your hand moving in a straight line, don’t throw your hand upwards or scoop it towards your target
- The power in the cross is generated from rotating your torso and hips while you shift your weight onto your lead foot
Hook: Hooks are usually thrown with your lead hand, but you can also throw a rear hook. We’re going to focus on the lead hook
- Throw your lead hand towards your target, hooks are typically thrown from up close
- Pivot with your core to transfer power to your fist
Uppercut:The uppercut is another punch you can throw with either hand. For our purposes, we’re going to focus on using your rear hand. This is another close-range punch
- The uppercut is thrown exactly like a cross but from the bottom rather than having your fist approach in a straight line from its guard position.
- Make sure you rotate your torso and shift your weight while throwing your uppercut
- Don’t overextend your punch
Cover Blocking: Boxing isn’t all about punching. You’ll get the daylights knocked out of your if all you’re doing is throwing punches. For heavy punching bag training, you want to employ as many of your boxing techniques as possible to keep your heart rate up and your skills sharp.
- Cover blocking starts in the guard position, and its quite simple
- Bring your hands up to your head
- Press them there and bring your forearms together
Slides: This is the only footwork we’re going to start you with. It’s an effective way to cover distance without dropping your guard or moving your guard position around.
- Start in the guard position
- If you’re moving forward, step forward with the ball of your foot rather than your heel, and then slide your rear foot forward
- If you’re moving backwards, step first with your back foot, again with the ball rather than your heel, and slide your forward foot back
- Always move your feet the same distance to keep yourself balanced and ready to move

PUNCH UP THE WARDROBE
You don’t want to just start whacking away at a heavy bag without the right equipment. Your hands are full of delicate bones, and you’re going to be throwing a lot of weight into your punches. To best protect yourself, at the very least get yourself some and hand wraps.
Boxing gloves are mostly to keep boxers from breaking their hands on each other’s bodies. The wraps help protect your tendons and muscles by setting your joints and they also absorb some of the impacts on your wrists.
5 HEAVY BAG WORKOUTS FOR BEGINNERS
You can combine these rounds into one twenty-minute workout, or you can work on one specifically each day, taking breaks in between each set. You’re going to alternate through all of the punches, blocks, and slide that you’ve learned up above.
Always start your workout with a warmup. You can get your blood pumping and start ramping up your heart rate with some shadowboxing.
- Get your gloves, wraps, or both on
- Stay light on your toes and box with an imaginary opponent
- Make sure to mix in all of the punches you know. Commit to them all, remembering to block, slide, and turn your body appropriately for each punch.
Round One:
Basic Training
This is the ground floor. This basic workout is where you’re going to practice your combos and your footwork. This is the foundation you’re going to be building all of your boxing skills on, and you’re never going to leave it behind. Take the time to really focus on your skills, and this will be indisposable.
- Start with one minute of all-out punching. Alternate between jabs, hooks, crosses, and uppercuts. After each punch, make sure to fully return to your guard position, and don’t let your arms drop.
- Move with the bag, and throw your punches when the bag is an appropriate distance from you.
- Move on to one minute of hooks with each arm
- Remember that hooks are close range punches, get closer to the bag for these
- Move on to one minute of speed.
- Keep your feet moving
- Try to keep your punches moving as quickly as possible
- Keep your slides tight, and don’t let up until the minute is done
Round Two:
This is a HIIT version of a heavy bag workout. You’re going to do exactly what’s on the label. Hit the bag fast and hard. Don’t let up until the interval is over, reward yourself with a short breather, and get back in there.
- After a brief warmup start throwing quick combos at the heavy bag for twenty seconds
- Rest for ten seconds, keeping your footwork up
- Repeat eight times
- You can make this HIIT workout longer by taking a break for about three minutes and continuing for as many eight set rounds as you can muster
Round 3:
Fancy footwork
This is the closest your heavy bag training is going to get to the cursed monotony of the treadmill. You’re still an active participant here, though, because that bag isn’t going to get moving on its own. Pick some combos you want to work on, and use them to get your bag moving.
- Get yourself warmed up
- Throw a couple of combos at the bag to get it moving
- Move around the bag, following the movement of the bag, tossing in some quick combos to keep it going
- Do this for three minutes
- Rest for a full minute
- Get back at it for three full rounds
Round 4:
Deadly Accuracy
This accuracy training is designed to hone the precision of your punches. If you’re going to start sparring with a partner, this is non-negotiable. You need to learn to work an area or pick out openings. If you’re missing your opportunities to get a hit in on an opponent, then you’re never going to win a match.
- Apply some targets to the bag
- Warmup, and get the bag moving
- Follow the movement of the bag
- Focus your punches only on the target you’ve placed on the bag
- Repeat for three rounds, one minute each
Round 5:
Power Punching
- Get warmed up by throwing light punches at the bag using about half of your strength
- Throw combos of your punches at the bag, keeping yourself moving the entire time
- Now that you’re warmed up, get a partner to hold the bag still
- Let go and unleash a barrage of full power punches for about 30 seconds to a minute
- Take breaks between barrages that are the same length as the barrages themselves
- Repeat for five rounds

TIPS OF YOUR KNUCKLES
As you start your heavy bag journey, there are a couple of things you should always keep in mind. If you start with good habits, you won’t have to worry about fixing them later.
- Keep your jabs and crosses are straight punches
- The force of your punches comes from rotating your body. Transferring the weight of your body through your arms is always going to be more powerful than flailing your fists
- Always pull your arms back into your guard position
- Plant your feet when you throw your punches
- Keep yourself moving when you’re not throwing punches. Follow the movements of the bag
- If you’re not throwing uppercuts at an uppercut bag, focus on sliding your fists up the side of the bag, rather than trying to jam your hands into a heavy cylinder
THE FINAL BLOWS
Heavy bag training is an amazing addition to any workout routine. It’s a high-intensity routine that will burn fat and add to your endurance immensely. You’re getting in excellent cardio and high rep exercise that opens the door to a whole new world of activity.
The heavy bags are a great way to learn the basics you need for boxing, and they’ll open the door to sparring with partners. Heavy punching bags are excellent for getting your general fitness level up, and everything you do will supplement your punching. The dumbbells and every single time you build muscle helps you throw your weight more effectively. The stronger your upper body is, the more time you’ll be able to spend in the boxing gyms, learning this beautiful martial art.